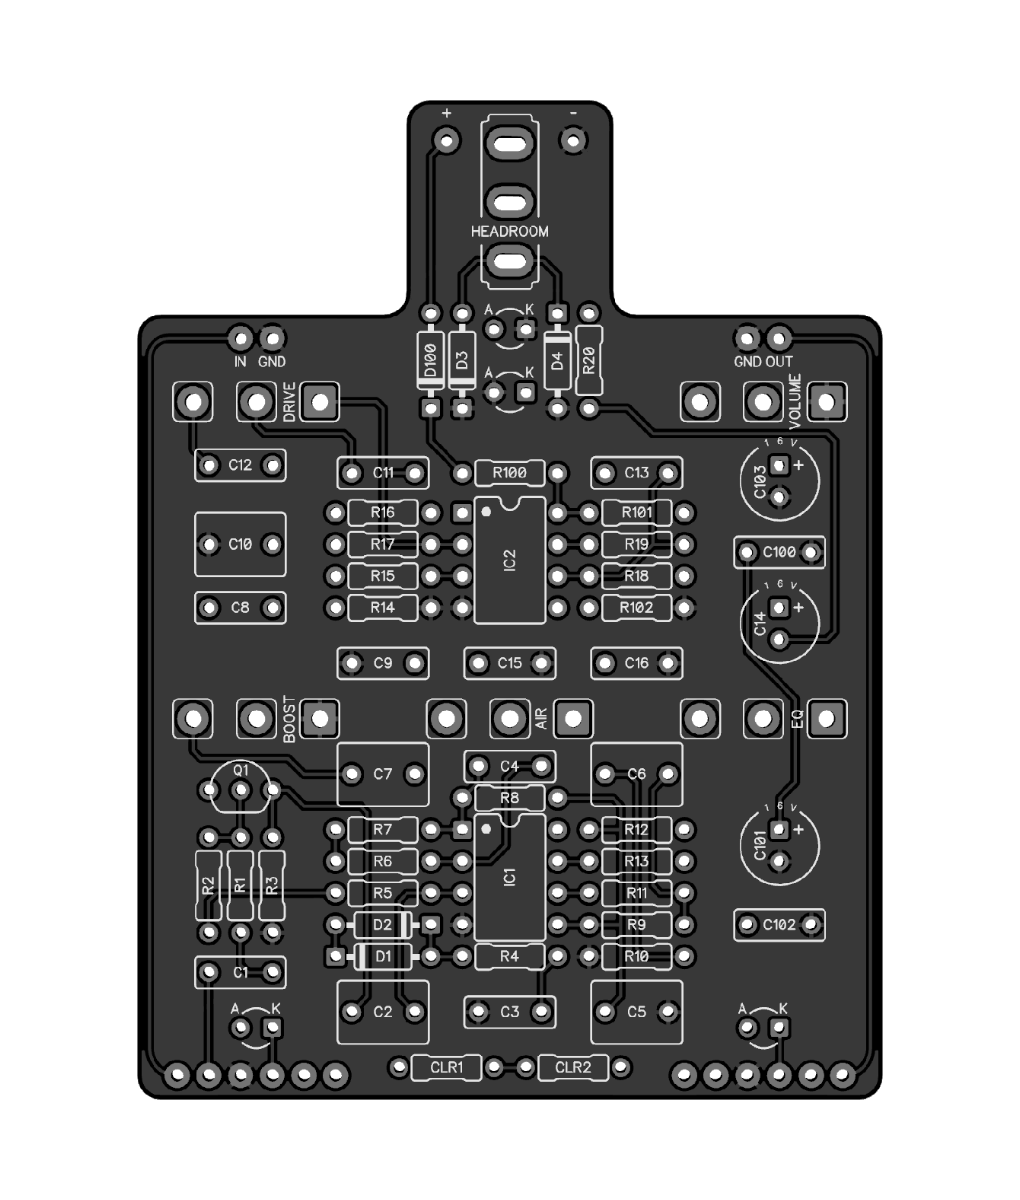
Controls
- Volume – Controls the master output volume
- Drive– Controls the amount of signal gain
- EQ – Lowpass filter that removes higher frequencies
- Air – Similar to amplifier presence control
- Boost – Controls the level of boost (when active)
- Headroom (Toggle switch) – Toggles between three different “wattage” settings (25W, 50W, 100W)
- Drive (Footswitch) – Toggles Drive stage on/off
- Boost (Footswitch) – Toggles the Boost stage on/off
Specifications
- Designed for a 125B enclosure with top-mounted jacks
Documentation

The company, product and service names used in this web site are for identification purposes only. All trademarks and registered trademarks are the property of their respective owners. This product is not manufactured or distributed by JHS Pedals, maker of the AT+.
PedalPCB is not affiliated with JHS Pedals.
| Weight | 0.5 oz |
|---|---|
| Dimensions | 3.075 × 2.35 × 0.5 in |
8 reviews for Angry Andy Plus
Only logged in customers who have purchased this product may leave a review.
Related products

Out of stock
Out of stock
spspedals (verified owner) –
Just got this together and my, oh my, I am impressed! This is a very versatile pedal and doesn’t seem to have a “bad” setting. Although you do have to watch setting the drive and boost all the way up at the same time; you may not be able to stop feedback. In my opinion, this is the perfect distortion pedal. And kodos to Pedal PCB for making such a user friendly layout and great instructions. I had no issues getting this together.
Ramil Rodriguez (verified owner) –
Definitely one of my favorites od/dist pedal. Very versatile, strong controls with a wide range of possibilities. Beautiful warm singing lead tones. Also a very nice working boost circuit.boost circuits. Great pedal. Love it.
wonsup (verified owner) –
Great PCB. I love the pedal. Two things I would caution when you are building, following the cutting template in the build doc:
1. drill the holes further apart for the on/off and boost switch. They are too close if you follow the pattern. I found this out too late.
2. The SPDT on-off-on switch did not align when I drilled the hole following the template. You will probably have to move it up by 1/4″ or so. Otherwise pretty straight forward build.
PedalPCB –
Be sure to disable any page scaling (Fit To Page, etc) when printing the drill template.
guy.r.groff (verified owner) –
I have owned a lot of drive pedals and this one is my favorite.
The large 2.1mm Lumberg DC power jack I used got cozy with one of the pots. I would suggest using a smaller one when you build this. Also, you should build this.
cmg1229 (verified owner) –
Absolutely fantastic heavy OD/Distortion pedal. Unlike the dirty channel of my Marshall tube amp, it’s hard to find a setting that doesn’t sound fantastic.
The build was quite easy, and the final layout looks absolutely fantastic. May I suggest, that if you are using the 3DPT breakout boards, it might be wise to drill the stomp switch holes further up so you can use breakaway headers to solder everything together neatly as one peice. Luckily my breakaway headers were long enough to bend into place, and it looks PRO.
Wundbar (verified owner) –
My first build and it sounds great. Love the singing lead tones but also good for heavier rhythm parts. Great circuit.
Same issue as others, the COMP switch layout location is too low by about 1/4″. My LED hole locations needed to be shifted down also, drilled those last after placing the pots.
sparris (verified owner) –
Just built this and I gotta say – it’s really good!
I do not have the JHS AT + so I can’t compare, but I’m quite convinced that this is every bit as good. As far as I can see the distortion side is essentially a tweaked Marshall Guv´nor, and I do have one of those. This is better due to the possibility to switch between diodes for different tones (25w, 100w and 50w) and better components. I do believe that the 50w mode comes closest to the Guv´nor since it uses red LED´s like the original. Every mode sounds great but I prefer the 100w mode… less gain, more open sounding.
The boost side is, as far as I can see a simplified Tube Screamer with set resistor values for overdrive and tone. I do have a TS-808 and the sound is quite similar when engaged alone. I’ve done som testing and I would say that the fixed values in the AA+ boost equals the Tube Steamer set with overdrive around 10-11 o’clock and Tone around noon.This works great and is actually how I set my Tube Screamer when I want to hit the tubes in my amp a bit harder. Just set the boost level to your preferred setting (3 o’clock is my preference) and you’re good to go. Works great in conjunction with the distortion side of the pedal as well as on its own.
A killer pedal all in all that´s gonna stay on my board for a long time. Great work PedalPCB!
airbud (verified owner) –
this pedal ROCKS. I built it next to the Friedman BE OD clone, and it wasn’t even close to my ears. I love the EQ section on the AT+ in particular. oodles of gain on tap as you would expect. but as with all JHS designs, the knob ranges are eminently usable.
definitely a must-build! my go-to for unopinionated distortion.